September 6, 2016,
0 comments
If you haven’t already done so, after reading the description and deciding which license applies to your situation, you’ll need to purchase Matlab from OSL here: http://software.utah.edu/news/mathworks.php (click the ‘Shop For Software’ button)
For students and single-machine installs, you should see the following link on your receipt or e-mail from software@utah.edu describing the process to download and install Matlab: Instructions for Single User Licenses
OSL also has a full FAQ page dedicated to the new campus license for MathWorks software: http://software.utah.edu/faq/license/mwc/
March 30, 2016,
0 comments
For remote access to most CADE/PCE IT services or systems, you need to use the Campus VPN (Virtual Private Network) with a valid uNID.
NOTE: If you are not associated with the John and Marcia Price College of Engineering, this is NOT FOR YOU.
1. Verify you know your CIS credentials and have Two-Factor Authentication (Duo) setup and that your Duo device is available. You will also need the Duo App on your smartphone or mobile device as campus requires 2 Factor Authentication(2FA) for VPN service.
* * * STUDENTS * * *
Before reading further, go ahead and opt IN to ‘Duo Security’, the U’s two-factor authentication (2FA) service. Log in to CIS and select the Duo 2FA Management tile to turn it on, or try here:
2. Download the VPN client, GlobalProtect and connect to vpn.utah.edu. See full details and info here: it.utah.edu/vpn
3. Enter your uNID and CIS password in the ‘password’ field.
For the ‘second password’, enter ‘push’ and you’ll receive the Duo prompt for approval (similar to the ‘Send Me A Push’ used in web apps). Alternatively, open the Duo App on your device and generate the ‘second password’ by clicking on the UofU banner/down-arrow- enter the 6-digit #.
Further information and instructions for support can be found at https://uofu.service-now.com/UIT/VPN KnowledgeBase Article and the https://uofu.service-now.com/UIT/DUO 2FA KnowledgeBase Article
October 9, 2015,
0 comments
Once logged in to a linux machine, open a Terminal and you’ll issue a few commands. By default, you start in your home directory (/home/username) and it may appear with a prompt to the left of the cursor indicating that (a user’s ‘home’ may be represented by the ‘~’ char).
If you don’t have a directory to share, create one with something like:
[warthogs@lab1-23 ~]$ mkdir TeamSamba
The directory inherits the default permissions, in this case rwx (read-write-execute for the owner, your username; read-execute for group; read-execute for everyone/all users:
[warthogs@lab1-23 ~]$ ls -ld TeamSamba/
drwxr-xr-x 2 warthogs csugrad 4096 Oct 9 12:47 TeamSamba/
To verify the groupname for setting the directory permissions, find out which groups you’re a member of:
[warthogs@lab1-23 ~]$ groups
csugrad telerobotics mediashare src cs6090 cei manu
And assign one to the directory:
[warthogs@lab1-23 ~]$ chgrp telerobotics TeamSamba
[warthogs@lab1-23 ~]$ ls -ld TeamSamba/
drwxr-xr-x 2 warthogs telerobotics 4096 Oct 9 12:47 TeamSamba/
Finally, set the permissions so the group can write files, but no other users can see in the directory:
[warthogs@lab1-23 ~]$ chmod 2770 TeamSamba/
[warthogs@lab1-23 ~]$ ls -ld TeamSamba/
drwxrws— 2 warthogs telerobotics 4096 Oct 9 12:47 TeamSamba/
See ‘man chmod’ or ‘man chgrp’ for syntax details and more information.
September 25, 2015,
0 comments
We have {finally} evolved to where each user has ONE username and ONE password for all PCE/CADE machines and services. We may refer to your CADE or PCE username and password. This is separate from your CIS/uNID and it’s password, but we may ask you to use those for authentication, such as when creating your account or changing your password.
Accounts created prior to ~May of 2017, CADE/PCE username is some combination of letters from your names (First, Middle(s), & Last) and generated by an algorithm. For all newer accounts, the username is your uNID (formatted as a lower-case ‘u’ and 7 digits). Once created, we don’t change them except in rare circumstances.
Your CADE/PCE account is used for:
• logging in to any Linux, macOS, or Windows computer on our Domain (USERS\ or users.coe.utah.edu), including lab machines, Terminal Servers, VDI hosts, or other Virtual Machines.
• connecting/mounting a Network File Share with CIFS/SMB.
• WebPrint and any PaperCut printing services.
• mounting a Network File Share with NFS.
Note: Your CADE/PCE username and passwords are 100% separate and in addition to your CIS or other campus logins and accounts. Some departments may have labs or computers that require specific logins.
October 2, 2013,
0 comments
The short answer: yes.
The longer version: If the machine has a static IP address, try connecting to that remotely. The machine must be set up to allow remote access (via ssh, Screen Sharing/VNC, Remote Desktop Protocol, etc.) and wake-on-network-access/NOT go to ‘sleep’, but if you don’t have administrator privileges on this machine, we may need to enable remote access for you (see below). We may also need to allow such a connection on the proper ports through the CoE firewall. You will need to be on the Campus VPN to reach your machine.
Connecting to a Windows machine:
– Try using MS’s Remote Desktop Assistant to configure your machine for remote access.
– On the computer you would like to connect TO, in Windows Explorer, right click on ‘Computer’, select ‘Properties’, then select ‘Remote Settings’ from the menu on the right.
– Select your user and ensure it has permission to RDC to the computer, and verify a password is set (RDC will not enable unless the user has a password, it cannot be blank).
– Get the machines IP address- open a command prompt (type “cmd” in Search and it will open) and type “ipconfig” (no ” “‘s) and it will list your IP (use the one in the form of 155.98.X.X, the wired ethernet address)
– On the computer you wish to connect FROM, open your RDC client, put in the IP address, login as the user with remote privileges and you should be connected to the current running session.
Connecting to a Mac:
– On the computer you would like to connect TO, open ‘System Preferences’ and the ‘Sharing’ pane.
– Check the ‘Screen Sharing’ or ‘Remote Management’ for general VNC access, ‘Remote Login’ for ssh access, other available as needed. Ensure you have added your user for the access level on the right.
– Get the machines IP address- click ‘Show All’/reopen System Preferences and click on ‘Network’, and find the Ethernet device in the left column, IP address will show on the right in the form 155.98.X.X.
– On the computer you wish to connect FROM, open Screen Sharing in the Finder via the ‘Go’ :: ‘Connect to Server…’. Enter the address as vnc://155.98.X.X
If you can’t get through or need help getting the machine set for remote access, send the IP and your request, plus any errors or issues you have to support@coe.utah.edu and we’ll help get you connected.
September 27, 2012,
0 comments
The door swipes for the CADE and Engman labs are now handled by campus authentication. There is no need for you to update your card number since it is automatically pulled from campus LDAP. If you get a new UCARD, it can take up to 48 hours for you to gain access to the labs.
September 25, 2012,
0 comments
What Matlab Toolboxes are available for students/research to use? What features are licensed for use in Comsol? Do we have a license for Fluent/Gambit?
Answers to these and more can be found on the license status page here: https://flex.eng.utah.edu
September 25, 2012,
0 comments
If you are off campus, on uConnect wifi or any network outside of PCE you must first establish a connection to the Campus VPN.
On campus or from the VPN, you can mount a network share/network drive by following the instructions below for your Operating System (OS).
Note: In the descriptions below, replace ‘sharename’ with the share you wish to connect to. To connect to your home directory, you can replace ‘earth.coe.utah.edu’ with ‘chips.eng.utah.edu’ and ‘sharename’ with ‘home/username’ (or home\username, on Windows).
For Windows users- open a Windows Explorer window and choose the menu ‘Tools’ :: ‘Map Network Drive.’ In the window that opens, choose a drive letter not in use, and for folder, enter the server and share name as follows: \\earth.coe.utah.edu\sharename or \\chips.eng.utah.edu\sharename (remember, where ‘sharename’ = ‘share-you-want-to-mount’). Click the ‘Reconnect at logon’ if that’s your preference, but you must check the ‘Connect using different credentials’ box. Click ‘Finish’ and enter your PCE username and password.
For macOS users- Switch to the Finder, select the menu ‘Go’ :: ‘Connect to Server…’ (or command-K). In the highlighted Server field at the top of the window, enter smb://earth.coe.utah.edu/sharename or smb://chips.eng.utah.edu/sharename and click the ‘Connect’ button. In the user credentials window that appears, ensure ‘Registered User’ is selected and in the Name field enter your PCE username as username@users.coe.utah.edu and CADE password, then click ‘Connect’.
September 24, 2012,
0 comments
The answer depends on what Operating System the machine is running.
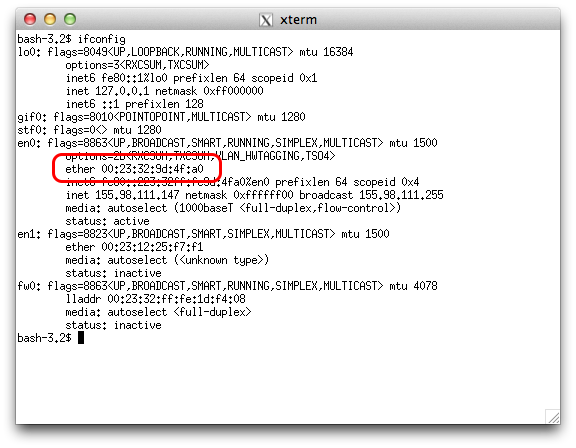
On UNIX-based systems (all flavors of Linux, Mac OS X, Solaris, FreeBSD, etc…), you can either use a Terminal/X11 window and issue the command ‘ifconfig’ and the MAC follows ‘ether’ under the en0, en1 or en2 heading – typically, en0 is for Ethernet, en1 is for WiFi/Wireless, so choose the proper section.

Image 1 – Mac OS X ‘ifconfig’
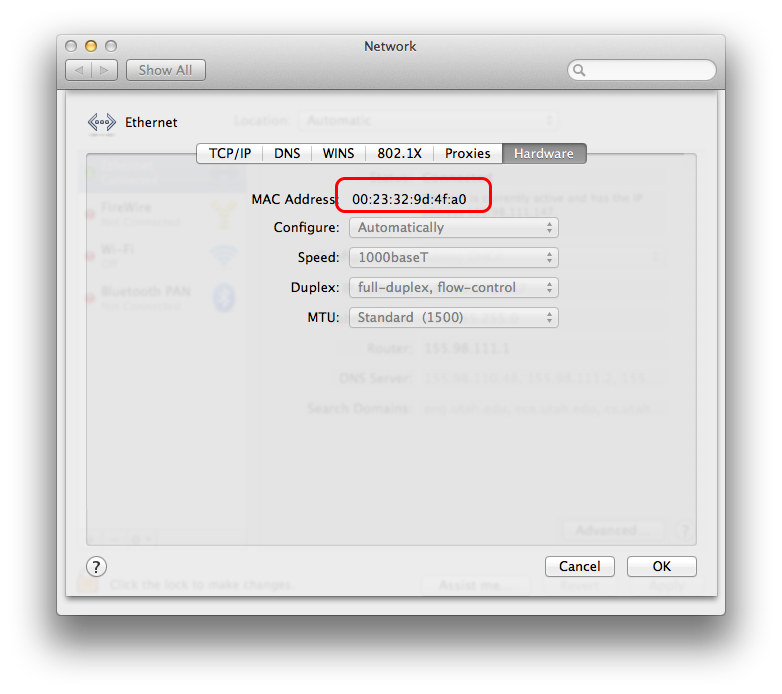
On Mac OS X, the other option is to open System Preferences (under the ‘Apple’ menu) and open the ‘Network’ pane. Choose your ‘Ethernet’ connection on the list in the left column, then click the ‘Advanced…’ button, then the ‘Hardware’ tab and provide the ‘MAC Address’. This second method can also help you verify you’ve got the right one from the first.

Image 2 – Mac OS X System Preferences – Network – Advanced – Ethernet
On Windows Vista or 7, open a Command Prompt by going to the Start menu and clicking ‘Run…’, then enter ‘cmd’ as the command to open and press enter. At the command prompt ‘>’, enter ‘getmac /v’ then press enter. The MAC address for your network connection will be listed in the Physical Address column. You may see more than one network device listed (as shown below). The Connection Name for your ethernet connection will typically start with “Local Area Connection” and the Network Adapter column will typically *not* include “VPN”, “Virtual”, etc…

Image 3 – Windows ‘getmac’ command
September 19, 2012,
0 comments
You can access any of the machines within the CADE Lab (Linux) with ssh and NoMachine. For ssh, from a terminal window, use ‘ssh -Y username@machine.eng.utah.edu’, where username is your CADE login. The naming convention for machine is:
CADE
CADE Lab HTML5 Desktop
lab1-X (where X is any number from 1-40)
lab2-Y (where Y is any number from 1-35)
If you are using a Windows system to access these machines remotely, please use Window PowerShell, putty or see our FAQ’s on CADE Lab Remote Access.
Windows Machines:
You can not access the Engman Lab machines directly, but you may access our VMware VDI pools for a lab-machine setup.
Please see the Windows FAQ’s for more information on how to connect to the Windows system.


